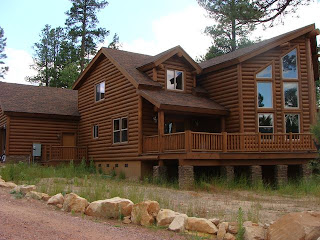
Welcome to Avalon Log Homes

Welcome to Avalon Log homes. While here you can check out our Luxury log homes, log homes, log cabins, Floor Plans, see our log home photo gallery and videos, get free log homes information, review 100's of our log home floor plans, Request a quote, read blogs about the log home industry, or link to our other social network sites all by Avalon Log Homes.

About Avalon Log Homes

Avalon Log Homes - Blending Luxury with Nature Avalon Log Homes is your Log Home connection all over the USA & Canada. Our expert team provides the finest quality log products and planning services to make your dream home become a reality. Log Homes, Custom Homes, Custom Design Services, Green Building Standards, & Construction Management. Avalon Log Homes offers a full line of services for luxury log homes, custom log homes, milled log cabins, handcrafted log homes, and timber frame homes.

Avalon Log Homes was founded by industry veterans and seasoned business

Professionals with close to a century of collective experience and more than 1000

log & conventional homes built. While Avalon Log Homes is certainly not the oldest log home manufacturer in the business, or the biggest, we are absolutely committed to becoming one of the world’s premier log home manufacturers.

Since our inception, we've built our business and strong reputation on a few basic

Core Values that guide everything we do. These include Integrity, Pride, Service,

Stewardship and Quality. Operating in this fashion has helped us grow Avalon Log Homes to be one of the fastest growing, most well respected log home

manufactures in the business.

Showing posts with label Log Cabin. Show all posts

Saturday, July 2, 2011

Log Home Foundation Design


Before you go off and buy a log home kit, you need to know a few basics. The first decision that you will be faced with is the foundation of course. Should you build on piers, on a solid foundation, on stilts or should


you include a basement. Honestly I cannot make these decisions for you, but the lot that you are building on will give you your first hint. If you have a lot that has a decent slope to it and it is perfect for a basement, you might want to consider adding one. The why of this is that a basement is going to be the cheapest square footage that you can get and will add more resale value than almost any other choice you are going to make. (besides the kitchen and glamor bath) Typically a basement will cost you no more than twenty to thirty dollars per square foot, depending of course on the market that you live in. If you want a solid foundation and the lot is suited to a basement, the cost will not be much more than the solid foundation alone.
Then there is the pier or stilt method, this works well and cuts costs considerable, the downside to this is that the sub-floor is going to require extra insulation to keep your feet


toasty in the winter. Another drawback to these types of foundation is stability, when you leave an open air-space below your house, you are giving mother nature a toe hold on your house. Log homes are heavy, they need all the stability that they can get. In a storm or tornado (if these things bother you and are plentiful in your area) your house is more likely to shift if the wind can get under it. The biggest advantage of these foundations is cost. They are certainly cheaper and allow you to get to the meat of your project allot quicker. If cost is a deciding factor, you can always enclose the foundation at a later date. Another drawback to this type of foundation is the water and electrical lines. Of course you don't have to worry about your electrical lines freezing, but your water lines are five times more likely to freeze with an open foundation. There is heat tape that you can apply, but these products do die and they don't tell you when they die. If you decide to go this route be sure to check your anti-freeze systems every year before winter and monthly during winter. You will thank me later.

Another newer type of foundation on the market is the pre-cast panel system. These are great because they do not require a footing and can be installed in a day (in most cases). After your panels are set, the builder comes in and installs a termite shield and then the sill plate. Almost all pre-cast systems require that the sill plate lap at least four foot on to the next panel. This is what locks them together and keeps them from shifting. This is IMPORTANT, if your builder neglects to do this properly, your foundation can shift when back-filled and the warranty will be voided. This is not easy to fix because the way the system works you cannot back-fill until the sub-floor is on. You will not discover the problem until it becomes a very expensive process. Keep an eye on your builder during this process. I once knew a very capable builder who was installing the sill plate when the homeowner discovered that his men hadn't followed the instructions. The builder was more than willing to fix the problem, but the homeowner ran him off the project. His theory was that if the builder was going to screw up this soon in the project, what other directions would he miss. Who can blame the guy, certainly not me. After your sub-floor is installed, you can pour the basement floor and lock in the walls permanently, then and only then can you backfill.
Now for the newest type of foundation to hit the building world. (not really that new, but new to most consumers, its been around for at least ten years) The hollow foam block. These blocks are made of styrofoam (much

like a cheap beer cooler) which interlock and are stacked very quickly. During the stacking process a series of reinforcement bars are installed along with plastic spreader pieces. (the plastic pieces prevent the blocks from spreading when they are filled with concrete.) While stacking the blocks, all of the openings are formed out, as a result these form boards become permanent bucks for your windows and doors. It is best to use pressure treated material for the bucks. Once everything is in place and a few kickers (which keep everything from shifting) are installed, it is time to pour the concrete. This is best done with a pump truck or a conveyor truck as trying to pour this much concrete with wheelbarrows and buckets is just stupid. The concrete could set up in the bottom of the forms and cause you to have cold joints. ( the reason I said anything about the how of this is because homeowners are notorious for trying to cheap out when it is important not to) Yes, your foundation will stay together even with cold joints and no one will ever see them, but it makes for a weak wall and is not recommended.

Whatever type of foundation that you choose, all of them will need a termite shield on top of them before the sill plate is installed. A termite shield is just a fancy name for a continuous aluminum sheet (aluminum flashing comes in rolls from ten inches to two feet wide) at least two inches wider than the top of the foundation. Flush this material with the outside of the wall and let it hang over on the inside. The theory behind this is that termites cannot walk over the slick aluminum preventing them from building a tunnel up the inside of the wall up to the sub-floor. Do not neglect this process, some builders swear that because of the chemicals used to protect the house that it is no longer needed. This may be true, but what if you forget to call your pest control guy one year. Wouldn't you rather have a cheap back-up instead of having no protection? This is not a costly procedure and can save your home in the long run. Do not let your contractor or anyone else talk you out of this step.

When building the foundation you will need some sort of method to attach the sill plate. (sill plates are almost always pressure treated two by eights) In the case of the pre-cast concrete panels, they leave holes every sixteen inches to two feet for you to bolt the sill plate on. Use every hole and the hardware provided as it will be rated for this application, this is extremely important when using this type of system and it could void your warranty if you don't. In some areas, such as coastal plains, your local codes will dictate how you must attach your sill plate. I built a log home on St. Johns Island outside of Charleston S.C. a few years back and their codes are as strict as anywhere in the nation. According to their code, from footing to ridge beam everything had to be attached using a variety of clips, fasteners and straps. Coming out of the footing and through the block foundation was a continuous strap that flattened out on top of the block and then was folded back over each side of the sill plate. This is extreme, but that house will never move.
The most common fastener for sill plates is the eight inch anchor bolt with a three-eighths inch threaded nut and washer. These bolts are shaped like an L and are usually put in the wet concrete about every two feet or


as required by your local codes. (keep in mind when you are installing your bolts that wherever one board ends you want two bolts so that the end of one isn't just laying there, this is especially true at the corners of the wall where you may need as many as three bolts, lay out where your boards are going on top of the wall to better plan for bolt placement) When you install your termite shield, just lay it out on top of the bolts and working from right to left, hit the flashing lightly with a wooden headed hammer on top of the anchor bolt, this will knock a hole in the flashing where you need it then you can drive the metal down flat on each side of the bolt. Be careful not to damage the threads on your anchor bolts, if you want to play it safe, put a nut on the bolt before you hit the metal and after you have a hole in the flashing lift it up and take the bolt off, this will straighten any threads that you may have damaged. Once you have the flashing on, you can bolt down the sill plate. Work from right to left and measure each bolt from the end of where you are starting. Make a straight line across the board with a speed square and then measure how far the bolt is from the outside edge. (when installing the bolts, it is best to stagger them alternating in and out while making sure the leg on the bottom of the bolt is covered well) Pre-drill each hole using a bit that is no more than one-eighth inch larger than the bolts diameter. Once the board is in place (you may have to work the board back and forth while hitting it with a two pound hammer) place the washers and finally the bolts. Tighten until the wood starts to compress, making sure not to over-tighten as you can pull the anchor bolt right out of the concrete. (allow the concrete around the bolts to cure at least thirty-six hours before applying stress)

If you have chosen a block foundation that you do not plan on pouring solid with concrete, you can stuff the cells where your anchor bolts are going with the left over mortar bags. If you will pre-plan and layout where your floor joists are going on top of the wall, you can place your anchor bolts in such a way that they do not interfere with the joists. You do not want to have to notch your floor joists before you even get started good.( if you neglected to pre-plan your bolt placement, you can always counter-sink the nuts and cut the top of the bolt off with a sawz-all) Most log homes have a double rim joist ( I like to call it a boxing band, that is the board that borders the outside of your sub-floor framing and your joists will be attached to it) This means that your anchor bolts must be at least three and a half inches in from the outside of your wall. ( I realize that this does not allow for much staggering of the bolts, but whatever stagger you can get will be better than having them in a straight line) Technically all of the pressure on a sill plate is down pressure which means there is no lateral force on the plate. This means that bolting the plate down only fastens the structure to the foundation and typically the weight of the house would hold it in place. However, during a freak wind event, there can be strong lateral forces on these bolts. These bolts also help keep the boxing band (rim joist) still while the builder is working on the sub-floor. So, even though they are not totally necessary, you wont catch me building a house without them. (I hope that makes some kind of sense to someone)
Another consideration when planning the foundation is it's final appearance. If you are planning on using stone or river rock for the exterior finish of your basement then the foundation must be left back the

thickness of your material to look right. Typically you will find that most log homes have stone covering the block foundation. Try to stay away from anything thicker than two inches as this is almost the limit of set-back that you can get due to how the first log course much be attached to the sub-floor. (this is why there is a double boxing band or rim joist) You have an unlimited selection of materials to choose from when covering a foundation. One of the cheapest methods (versus painting the block) is to stucco the exterior wall, (natural stucco is just two or three layers of colored portland cement, synthetic stucco is an expensive material that must be purchased be a licensed professional) the advantage of stucco is that no set-back is required making pre-planning a little easier. The biggest drawback to stucco is that if your builder doesn't use a good bonding agent or it is applied at too cold of a temperature, the material can flake off leaving your wall looking like a dalmatian.

Then there is brick, honestly I don't think brick belongs anywhere near a log home, (that is a personal opinion) brick offers the same challenges as stone as you will need to set the foundation wall back to allow for the brick. There is also a product which is face brick which is only about five-eighths of an inch thick and goes on much quicker than standard brick. With this material you will also need to set the wall back to allow for the difference in thickness. Whatever the choice even if it is fake brick (stucco applied to one-half inch thick and then mortar lines scratched out to resemble brick) the challenges are certainly the same and must be accounted for before you begin construction. If your contractor has half a clue about what he is doing, this will be as easy as pie for him. A novice will screw it up and have your brick, stone etc. sticking out well beyond the face of your logs. This will look like (insert your choice of expletives here) and the cost to fix it will be astronomical. So, do it right from the start. The bad thing about making a mistake in the foundation is that it compounds itself throughout the building process. A quarter of an inch out at the bottom can turn into three inches at the top.
Decks, porches, stairs or any other exterior attachment that will eventually be attached to your home at the sub-floor must be planned for now. Wherever you plan on putting a deck etc. plan on using a pressure treated


board for your outside boxing band (rim joist.) Even though you will install a vapor barrier and a piece of aluminum flashing to protect your sub-floor, use a pressure treated rim joist at all of these areas. When you eventually build your deck etc. make sure to bolt it to the rim joist with lag bolts at least every two feet and preferably every sixteen inches (through bolting is even more efficient but requires more work), making sure that the bolts (these bolts should be at least three-eighths in diameter but no more than five-eighths) will penetrate through all three layers of the rim joist. (in most areas of the country this is code due to the many deaths and injuries from decks failing during parties or other unexpected load events) You especially want to use these methods if the deck or stair is not covered by a roof (technically a deck with a roof is a porch) even though you will probably slope the deck away from the house, water tends to get in places where we don't want it. More often than not this area of the boxing band will rot out if not planned for in advance making the attachment unstable and unsafe for you and your family. You can prevent this before you even start if you know what to look for and how to solve the problem. I have heard a many old man say, "I will be dead and gone before this roof leaks or that wood rots" This is not fair to whoever inherits your property after you even if you plan on selling the property or are building it for spec. Of course the decision is ultimately yours, but wouldn't you rather have more selling points than possible faults in your project? (who knows, the buyer may have read this article to) I know you will make the right decision for your situation.

Visit us at http://www.avalonloghomes.com or email us at logs@cableone.net

Monday, March 7, 2011

The Merced Log Home by Avalon Log Homes


See this Gravitas Series plan at http://www.avalonloghomes.com/floor-plans/the-merced

The Merced is an adorable 1784 square foot 3 bedroom 2 bath home with a main level Owner's Suite. The open loft with a full shed dormer on the upper level would make for a great office space or play area. The four sided wrap around porch and screened porch almost double the living space for outdoor dining and entertaining and relaxing.
From the soaring ceilings, elevated windows, and refined design of the commanding fireplace in the great room overlooking the very dramatic back view scene. The large gourmet kitchen has abundant cabinets and countertop space with eating bar. The master bath offers walk-in shower, as well as a spacious walk-in closet and dressing area. There is masterful sense of styling and sophistication clearly evident in The Merced design which you will appreciate more with each passing year.

Wednesday, February 16, 2011

MAKE YOUR LOG HOME DREAM A REALITY


This article will serve as a guide on how to achieve that dream of owning a log home. Before you start searching for a log home company, there are several things to you should think about: what features you desire in a home, the log species and profile that you like, and how much of the building you are willing to do as well as a price range you are willing to spend on your log home (built to completion with or without land included.

The first step in making your dream home become reality is to choose a log home company. Easier said than done because there are hundreds of log home companies competing for your business. We researched about fifty different log home companies before we made our decision and yes it was time consuming but you need to find the company that best fits your needs. To narrow down the list of companies to choose from, decide on the log species (i.e. White Pine), log profile (i.e. round), size of logs, type of logs (kiln-dried, dead standing, air dried, green), and the building system that you like the best. Another way to narrow down the list is to tour log home models built by different log home companies and, if possible, tour the log home mills themselves. Now you need to submit a sketched floor plan of your dream home to the companies that you have chosen and obtain a log home package cost estimate that includes a shipping estimate. When comparing price quotes from these companies make sure you are comparing "apples to apples", meaning each companies log home package is slightly different than the other. Choose the package that best suits your needs and price.

The second step is to decide how much "sweat equity" you are willing to put into your home. The more that you are able to do yourself means the more you will be able to save in labor costs. How much does it cost to complete a log home depends on the labor rates in your area. Most log home companies can quote a turnkey price (completely built home, ready to move in) as well as just the log home package price. Research different labor rates in your area as well as building materials that are not included in your package and compare these costs to your turnkey price given to you by the log home company. Ask your log home company if they can provide a list of area contractors. Being your own general contractor also saves money by subtracting about 10%-20% off the cost of building your log home, however you have the headaches that go along with that job. If you decide to be your own general contractor, you will need to develop a cost estimating worksheet with a breakdown of all the costs associated with building your home.

Is the price of your dream home still within your budgeted range? If the answer is yes, then you can move on to obtaining financing. If the answer is no, then there are some areas where costs can be reduced provided that you are flexible. You may opt for more "sweat equity", choose a smaller diameter log, reduce the size of your basement, or settle for less square footage to bring your price down. It is typical when building your first home that adjustments need to be made in order to fit your original budget.

Finally, your cost estimating worksheet is done and you have your blueprints, now you are ready for financing. There are quite a few lenders out there that specialize in log home financing which is slightly different than traditional stick built financing. Again use the resources of the log home company you have chosen, they should be able to provide a list of specialized lenders as well as help you with the financial paperwork. Do your homework before approaching a lender and the process will run smoother. Most lenders offer a construction loan for up to one year and then required you to re-qualify for the mortgage loan after your home is completed. Another option is a "One Time Close" loan which combines the construction and permanent financing into one easy loan. One Time Close loans are nice because you only pay closing costs once and usually only qualify once for the loan. These loans are usually given at a slightly higher interest rate during the construction loan period and can be "rolled down" at the time that the permanent loan starts. When financing your loan, be prepared to have a down payment of 5%-15% of your loan value and in most cases you may use the value of your land as your down payment provided you own it free and clear. Once financing is approved, you can begin building your dream log home.

Now you can let the seed grow into a beautiful log home that someone else will admire. Keep in mind that the process of building your own log home is time consuming and Murphy's Law does apply, but the end result is rewarding.
See this and other log home articles by Steve Ryan at loghome.com

Check out our Log Homes, new log floor plans, client photo galleries, new articles, and videos at http://www.avalonloghomes.com/

Monday, September 13, 2010

Avalon Log Homes – The Edgewood Log Home Plan


Log Home plan features a split 3 Bdrm, 2.5 Bath single level with garage. If you like wrap around covered porches this one has it! This is one of Avalon Log Home's most popular plans. The great room, huge kitchen, & nook is designed to for family enjoyment. Formal living room & Den are up front in the house. See this floorplan at http://www.avalonloghomes.com/floor-plans/edgewood

Monday, May 17, 2010

Saving Money When Designing And Building Your Dream Log Home


Saving Money When Designing And Building Your Dream Log Home


Consider log home design options:

You have a wide variety of log home design options to consider.
At the top is a handcrafted log home or a timber frame log home. From there you can go with a milled log home and even a conventionally framed home with log siding and log accents for those on tighter budgets.

The savings start with the design of your log home.
- The best way to begin your design is to find a floor plan that is close to what you are looking for, mark it with your changes and send it to one or more log home companies of your choice. Most log home companies will gladly advise you on your custom log home design, where to save money, and then quote a kit price. Don't be reluctant to begin a design with your unique requirements. Rarely (and I do mean rarely) does a company ship the same log home kit twice. If you are having difficulty finding a plan that fits your life style, go to a search engine (e.g., www.google.com , www.yahoo.com, etc.) and search on “log home plans.” You will find many log home companies listed; most of which have extensive libraries of standard floor plans. Another option would be to search on “house plans” where you will find a mind boggling number of companies that sell conventional house plans, including a few also offering log home plans. Remember, most log home companies will gladly convert a conventional house plan to a log home plan. Remember, the more corners in the foundation, the more complex the roof system, the more windows called for, the more exposed rafters called for (as opposed to locally manufactured roof trusses), the more the home will cost.

Do the log home labor yourself. - This is the opportunity for the greatest saving. Of course, most of us work full time at other jobs and do not have the time for such an undertaking. However, if your heart is set on researching this option, visit any of the online book sellers, search on “log homes” and order one or more books that focus on the construction of log homes. But perhaps the wisest choice would be to contact a nearby log builder and negotiate an hourly rate for consultation or have them give you a proposal to be a construction manager for you for a fixed fee or percentage on the costs. This method allows any savings to be passed back to you. It is best to spend time and money up front to get the job done right, rather than deal with problems later that never seem to go away.

Act as your own builder. - This is your option for the second greatest saving. Many log home buyers decide to be their own general contractor. However, be aware, this choice is not without its headaches. That is why you save all those bucks! Local building officials can be difficult to work with; subcontractors will be late or never show up; deliveries will be late or the wrong materials will be delivered; the weather is unpredictable; subcontractors and suppliers may take advantage of your inexperience. And the list goes on. Regardless of the pitfalls and stress, acting as your own general contractor will still save you about 15% - and that is big bucks. If you elect this option, again visit online book sellers, search on “log homes” and purchase one or more books that deal with log home construction. Contracting with an experienced builder to serve as an advisor or construction manager is highly recommended.

Shop for financing the same as you shop for building materials, appliances, etc. – If there is no local lender experienced in the financing of log homes, go to the search engines and search on “log home loans” or “log home mortgages.” Lenders will not charge you when you apply for a loan. File applications with two or more lenders and then select the best deal. Sometimes it’s good to look at a national log home lender with log home experience.

Select your building lot with caution. - How long will the driveway be? If you must install a septic system, a health permit is a prerequisite, and then, will it be necessary to pump to the drain field? Will it be necessary to cross a creek? How much grading will be involved? Is tree and stump removal going to be a problem? Will there be a rock problem when the foundation is excavated? In other words, a "cheap" lot can quickly become an expensive lot. If you are having difficulty finding a lot, contact a local real estate agent. Give the realtor your lot selection criteria (price range, location, size, etc.) and tell him/her to search the Multiple Listing Service data base. There is no charge for this service. The true price of the lot should include all those things necessary to have it ready to build on including driveway, sewer, water, & power systems on-site.

Select your log home builders with caution. - When talking to builders ask for references and visit log homes he/she has built and talk to the home owners.

Select carpet as your floor covering rather than hardwood floors. - Yes, hardwood floors are a "natural" in log homes. But we are looking for opportunities to save money. Perhaps you can compromise. Put hardwood in the great room and carpet elsewhere. Remember, at a later date (after you have received a job promotion or two) you can always replace carpet with hardwood.

Use Cultural Stone for wall accents and fireplaces attached to plywood and studs in lieu of a full masonry or stone. - Don't tell your friends. It's impossible to see the low cost plywood and studs thru the cultural stone. Real Stone also weighs a lot and can require additional structural support. This decision can save you a lot of money

Consider an efficient wood stove over an inefficient and more expensive fireplace. - Select black flue pipe instead of a masonry chimney. The black flue pipe looks great in a log home.

Build your log home on a crawl space rather than a basement. - Again, we are looking for opportunities to save money. Sure, a basement is cheap floor space and many buyers opt for the extra storage, shop and/or recreation room space; never-the-less, eliminating the basement will save $15,000 - $30,000 in a typical home.

Have your custom fixed glass manufactured locally. - Yes, your window supplier will want to order your fixed glass from the factory. While he/she is getting a quote from the factory, visit a local glass shop. You may be pleasantly surprised. Locally manufactured fixed glass windows are available with double glass and/or tinted glass.

Select your windows and doors with care.
- This is a major opportunity for savings. Compare the quality and cost of several manufacturers before making a decision. If you expect to have a large number of windows and exterior doors, ask the suppliers if you qualify for a truck load discount.

Select your plumbing fixtures, electrical fixtures and kitchen cabinets with care. - These are also major opportunities for controlling your costs.

Start shopping early.
- Whether you hire a builder to do a "turn key" job or act as the general contractor, you can save money on individual items in the house - for example, appliances, floor coverings, windows, doors, plumbing fixtures, kitchen cabinets, counter tops, etc., etc. The earlier you start shopping the more likely you are to find items on sale. Just let your "turn key" builder know in advance that you plan to shop for sale items and BE AWARE, if you slow down or inconvenience the builder, you will quickly lose what you saved and probably much more.

Best wishes as you embark on an exciting journey.

Check out our Log Homes, Log Cabins, Luxury Log Homes, new log floor plans, client photo galleries, new articles, and videos at http://www.avalonloghomes.com/